

good morning!
as promised...
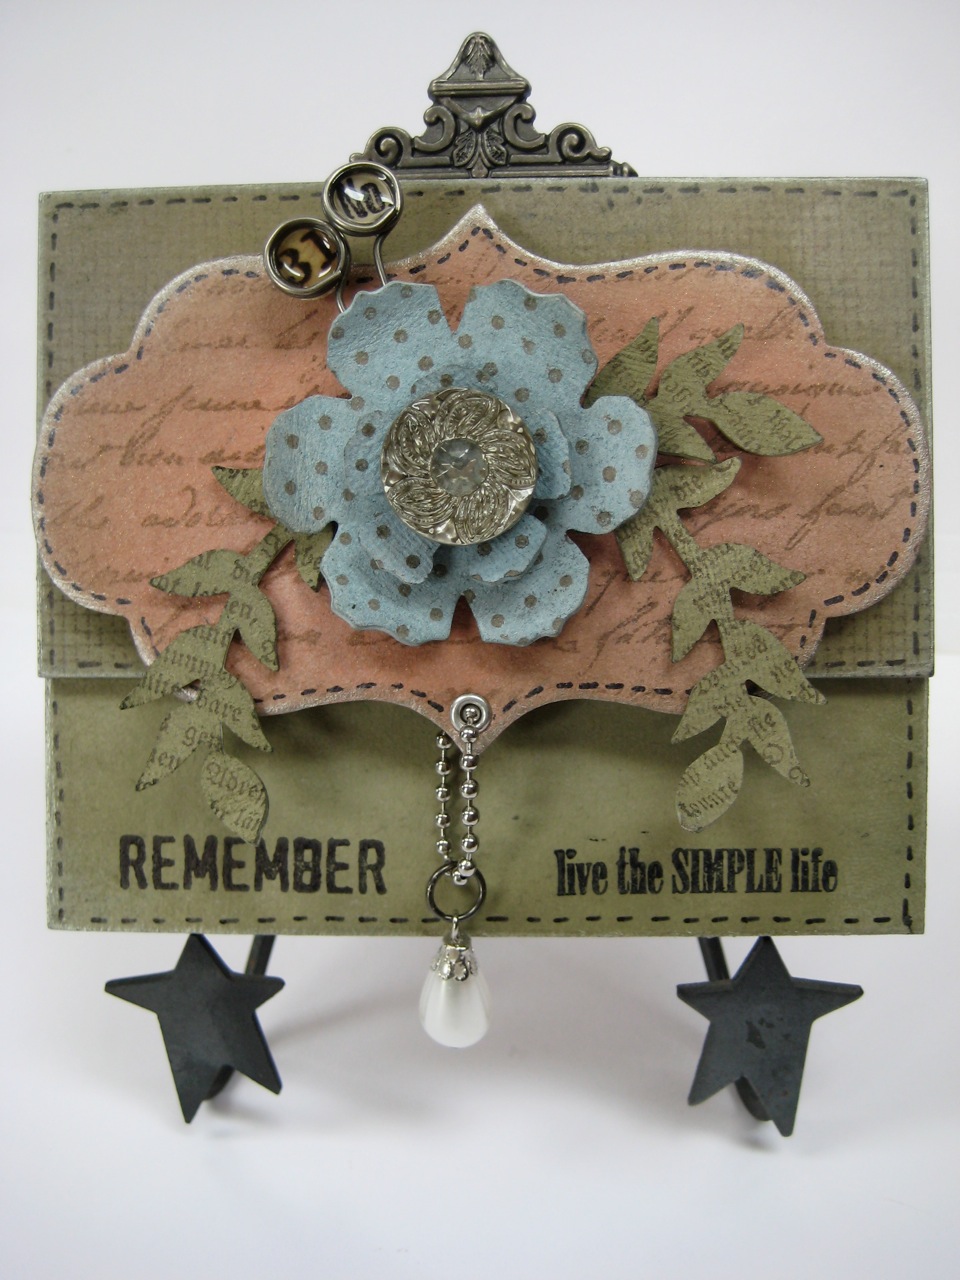
here's a very fun project...
complete with supply list & instructions...
just for you...
my blog friends...
supplies you'll need...
tim's newest distress inks in these colors...
blending tools with foam...

You'll want to work on Ranger's non stick craft sheet...
and have the heat-it tool ready...
then grab these Ranger supplies...
oops...forgot to include the Glossy Accents...
in the photo...
that holds everything together...

you'll need tim's alterations (Sizzix) dies...
the leaves from regal crest
the styled label
and the tattered florals
and speaking of dies...OMG...
it's WAY WAY WAY COOL...
check out the video...
it can't come soon enough...phew...hot flash...too excited...can't think about that now...
ok back to business...
from tim's idea-ology line...
one jump ring
one ornate plate
a small piece of ball chain
a new button
and a pearl from the new bauble package
2 cut outs from the 3 1/2 x 5 1/2 art parts frame
plus these...
studio 490 stamps:
screen from art rules
script from live & make art
text from botanical art
polka dots from seriously art
remember from collectible art
live the simple life from residential art
general stuff...
this cool tool...opens jump rings like magic
one silver eyelet & eyelet setter
chipboard scraps
precision pen for pen stitching
the info for making the custom epoxy memo pins is here...
ready to start?
*make 2 epoxy memo pins (they take several hours to dry)
*using grungeboard, die cut the leaves and the 2 flowers, using tim's alterations dies
*using chipboard, die cut the styled label
*using snow cap, tap the pad directly onto the flowers, leaves, label & 2 art parts rectangles
*use the heat-it tool to dry, then apply a second coat to each piece, then heat to dry
make sure to cover the fronts & backs of the flowers and leaves
*using the blending tool & forest moss, ink both art parts pieces & also the leaves then dry
*using the blending tool with stormy sky, ink the flowers front & back then dry
*using the blending tool with rusty hinge, ink the label then dry
*using coffee archival, lightly stamp one arts part rectangle with the screen stamp and the die cut label with the script stamp then dry
*using coffee archival, stamp the flowers with the polka dot stamp then dry...
don't forget the backs!
*using coffee, stamp the text over the leaves then dry
*using jet black archival, stamp the plain green rectangle with the word & saying then dry
*using the silver dabber, lightly edge the 2 rectangles & the label
*add the eyelet to the bottom of the label as shown, then insert the pearl bauble on the chain as shown. use a jump ring to attach the pearl to the chain
*using Glossy Accents, glue the 2 rectangles as shown...overlapping them by an inch
*add a scrap of chipboard under the label & glue in place
*shape the grungeboard pieces then glue to the label. add the leaves then the flowers over them
*add the button & embellish with the epoxy memo pins
*add the ornate plate to the back of the hanging...
*a little pen stitching is the finishing touch
*now...sit back & admire the art YOU created!
Here's a closer look...

what I LOVE about this technique is that it totally changes the look of the pigment ink and the distress inks too.
by combining them, you end up with a whole new color palette & TONS of possibilities...
this is the technique that made me fall in LOVE with the pigments...
the chalky look is cool...
and also the fact that you CAN use the blending tool with them too! that's a story for another day...
I hope you enjoyed this...
Get out your supplies and...
make art!
wendy
well...DUH...nice post...
BUT...art parts & a few of tim's things aren't here just yet...
but you'll be all ready when you do get them!
ps...art parts will be shipping soon...
book #3 too!
tim's stuff in Sept...
and that VAGABOND...like I said...
not soon enough for me!
37 comments:
very neat, thanks for sharing .... hey I have all those items!
Sandra
well most of them ....
Sandra
Wonderful art! Looks so cool in this muted fashion. Thanks for the tut.
That is gorgeous, I feel a shopping spree coming on :D
What a fab tut! I was just thinking - don't have that, don't have that - but will give it a go with what I do. (Plus they're on my shopping list!) Thanks for showing us in detail.
Great tutorial, Wendy! Hope to modify it somewhat and use the items I actually do have!
Wonderful tutorial, Wendy. I have grungeboard & those dies of Tim's, but I guess for the rest, I'll have to make some substitutions. But that's OK - that's what makes it art!
Wonderful tutorial Wendy ... great detail and a fabulous project ... as for Book Number 3 ... I CAN"T WAIT :0)
Wendy -
Thanks so much for the great tutorial. So detailed, even I can follow it - LOL! Can't wait to try this.
Thanks
Elaine Allen
It's just lovely! Thanks for the tutorial!! :)
Fabulous piece - love it!!
Wow, wow, wow, love this look, can't wait to try it out. Thanks for sharing with us.
Fabulous tutorial! Thanks for sharing!
Linda
Beautiful looks! Thanks for sharing Wendy!
This is so pretty! Hopefully I can play around with some of these ideas later today.
This is so pretty!!Hopefully someday I'll have the extra funds to buy these products (I have 2 family living with me and only my income YUK) but soon LOL thanks for sharing
Thanks for sharing this technique and project. Can always use what I have and adapt it to this! Thanks for the inspiration!
Thanks Wendy!! Can't wait to create!! Have a Great Weekend!!
Larissa Heskett
Just beautiful Wendy! I will have to make modified art until the goodies are available. Thanks for the wonderful tutorial.
Okay bookmarking it so when I get all my Art parts I can give it a try thanks . ..
Great project and tutorial, especially the tip on another use for the snowcap ink. It always stays out on my table, glad I have a snow cap reinker. I watched the video on the Vagabond, Yikes!
Cool project! Now I have to go out and buy the snow cap ink.
Sue
Nice project!Great to be indoors right now. Too hot and too humid for any outdoor efforts for yardwork. Might as well get out the inks, the dies, etc. to create a weed-free flower!!
Great tutorial Wendy ... love this project and since I have most the products you used, it will be this weekend's project for me to try. Thanks for sharing!!!
Thank goodness I now know how you combined the pigment and distress for that soft look, it's so cool! Can't wait to try that out. Thought the distress inks might slide right off the pigment, but guess not! lol! This is a very cool look, and yes, the whole other color palette is amazing, I mean, look at the difference in the forest moss, which is a dark green color! Awesome! Thanks for sharing!
P.S. Got my book yesterday, thank you so much! It's full of Wendy art goodness! Yeah!
Thanks for the directions. I saw you do something similar at CHA and loved it. Can hardly wait to get in my Art Parts. Thanks!
Wendy, thank you SOOOOO much for sharing, wish all the other designers would share step by step instructions for projects on their blogs! Can't wait to get your art parts and when I do this will be THE first project I do.
Thanks for the great tutorial. Thinga are a little hectic around here right now but I'll give it a shot in the future.
Wendy,
Awesome!!!Thanks for sharing this technique with us! The chaulky look is very neat.Can't wait to get my hands on more supplies.....
Karen S. Ohio
Love the art!!! Thanks so much for the tutorial!!! One questions... I did a couple of memo pins and my Glossy Accents used in the memo pin turned blue next to the metal... has yours done that at all????
Love this look! Thanks so much for the tut:)
That is lovely!
Been gone for a while, I'm back, yeah! I got really excited tonight, I found your stamps at archiver's. Sorry honey, I spent money. But you can tell your honey now there is more money coming your way!
Thanks for the great tutorial! You know you are an "enabler." I now have more things on my wish list to get as soon as they're available!
Thanks for the tutorial. It's great learning the methods used to make your art! Can't wait to try this at home (or at least something inspired by it).
This looks soooo cool...I sat down with some GP flowers and the white pigment ink to get started. One question, though.....is it normal to take a LOOOOOOONG time for the ink to dry, even with the heat tool? I'm waiting and I'm waiting and I'm waiting......still moist!
Eileen in NYC
Gorgeous project, thanks for the tutorial as well!
SHaron Field
Post a Comment